
Mixing skin tones and moulding faces
Create charming characters with the Katy Sue Head & Arms Mould Set. Learn how to mix skin tones and model faces with air drying clay using the two moulds included in the set with craft artist Heather Robertson. Make a variety of craft projects such as plaques, dolls, and decorative boxes or jars.
Did you know that doll making was how Katy Sue began?! Sue and her mum Doreen started making miniature porcelain dolls 30 years ago, including casting the figures, styling the hair and making tiny clothes – a true kitchen table origin story!


What you'll need

- Head & Arms Moulds (CLICK HERE)
-
The Measuring Mould (CLICK HERE)
SAVE when you buy our bundle offer including both moulds - Eyeshadow & blusher / paint to colour your characters
- Hearty Air Drying Clay in your desired colours
- Wool or doll's hair (optional)
Mixing a range of skin tones
Using The Measuring Mould, follow Heather’s recipes below to mix a gradient of flesh tones.

Lighter tones: Mix 1 part Yellow Hearty Air Drying Clay, with 3 parts Red Hearty Air Drying Clay to get a concentrated pink toned base.
Fill the number 1 cavity in The Measuring Mould with White Hearty Air Drying Clay, making sure it is level with the top of the mould cavity.
Press the coloured clay into the corresponding numbered mould cavity, making sure it is level with the top of the cavity.
Mix the white clay and base colour clay together to create your desired shade.
Darker tones: Mix darker skin tones by mixing Dark Brown Hearty Air Drying Clay with White Hearty Air Drying Clay, following the recipe on the colour guide included with The Measuring Mould.
TIP: When using a light flesh tone, Heather prefers to use a lighter rosy shade as the clay will darken slightly when dry. For darker flesh tones, Heather prefers to use the darker brown tones of clay as they have more depth of colour.
Moulding a head and arms

Dust the Head & Arms Moulds with cornflour and tap out any excess, or brush very lightly with vegetable fat such as Trex (this helps the clay release from the mould).
- Take your desired tone of skin coloured clay and press into the Arms Mould.
- Flex the mould to begin releasing the clay. Gently remove one arm, starting at the fingers and forearm, then work your way around to the shoulder and finishing with the other arm and hand.
- Roll a small ball of clay and place this into the neck cavity.
- Take another ball of skin coloured clay and press firmly into the Head Mould, ensuring that the facial details are nice and smooth. Round the back of the head gently smooth and shape the clay with damp fingers. Keep the base of the head and chin flat. Gently squeeze then open the mould to carefully release the head. Smooth any edges.
- Make a small hole in the base of the head, between the chin and ears and carefully place the head on the neck, in your desired position – a little PVA glue can be used if needed.
Strike a pose

You can change the entire feeling and mood of your character just by changing the arm and head positions.
Once your head and arm pieces have been moulded, and while the clay is still pliable, play around with the arm and head positions to see what emotion you can get your characters to convey.
Bring your character to life!
When your pieces are nice and dry it is time to bring colour to their faces, open their eyes (or not) and give them some hair.

To colour faces Heather prefers to use the following:
- Old eyeshadow and blush palettes in rose, pink, copper and orange tones
- Soft eyeshadow brushes and applicators
- Acrylic paint – black, white, blue, green and light brown or gold
- Dotting tool (used for nail art) and/or a cocktail stick
- Watercolour pencils – black, yellow ochre, grey, brown, reds and pinks
- A fine tip paint brush

Add a healthy glow to your character by brushing eyeshadow onto their faces and arms. Heather likes to use shades of orange and copper on darker skin tones, and rose and pink on lighter skin tones.
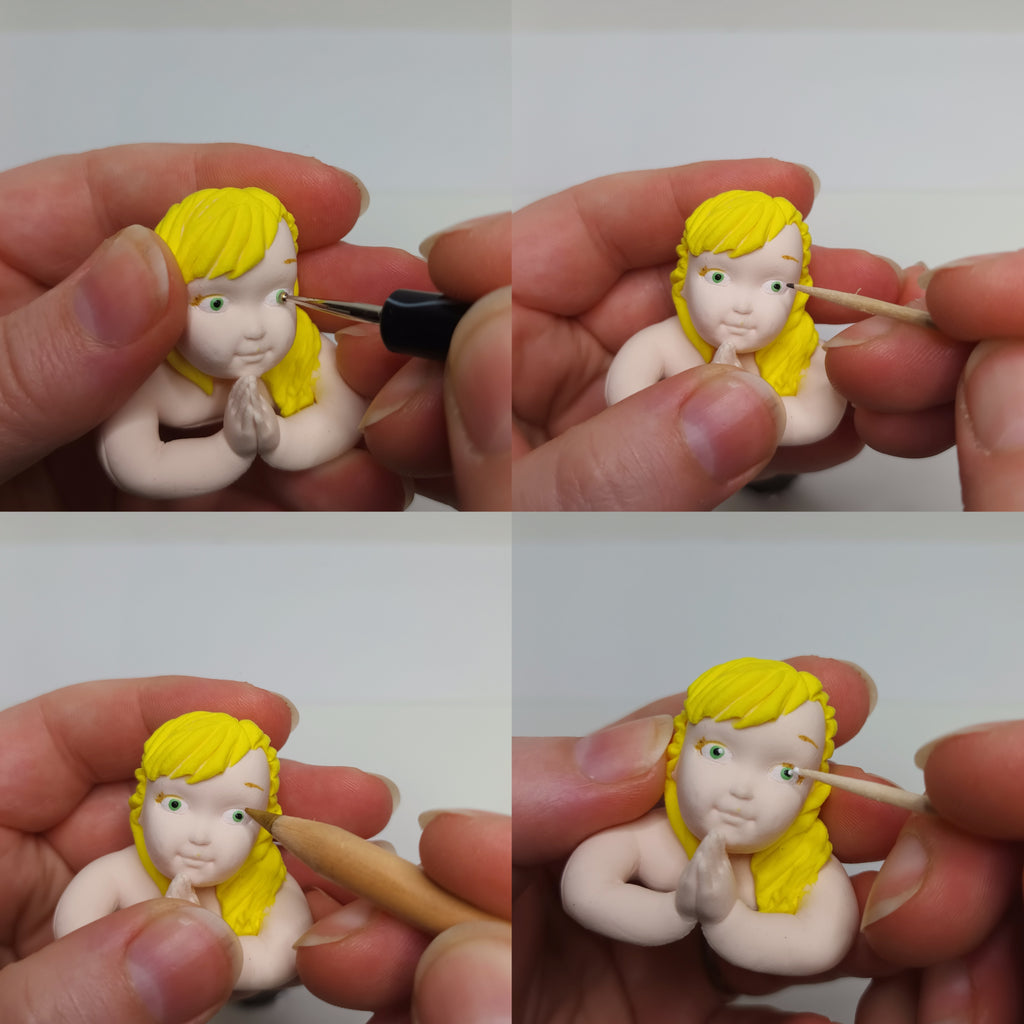
- To give your character open eyes, carefully paint the eyes white using acrylic paint with a fine tip paintbrush and allow to dry.
- Then using a dotting tool, place a dot of blue, green, brown or gold acrylic paint in the centre of each eye.
- Once dry, use black acrylic paint and a cocktail stick to add the pupil of each eye.
- Once the pupil is dry, add a small dot of white acrylic paint using a cocktail stick, to add a little highlight to each eye.
- Use a sharp damp water colour pencil to draw in each eyebrow and the top eyelid.
- Keep your pencil sharp to keep the lines thin.
- Wipe your sharp watercolour pencil on a wet wipe or damp cloth to gently soften your pencil.
- Only draw in the top outer edge of the eyelid to keep the eyes soft.
- For closed eyes, just draw in the eyebrows and a thin line on the bottom outer edge of the eyelid, to indicate the eyelashes.
When your pieces are nicely painted it’s time to add some hair.

This can be done in many ways:
- Sculpting hair with more Hearty Air Drying Clay
- Gluing wool or doll's hair onto the head
- Drawing fine hairs with watercolour pencils
- Needle felting wool, wool fibre or doll's hair into dry Hearty Air Drying Clay – Heather's favourite method!
- When dry, Hearty Clay provides the perfect base for needle felting. The clay is nice and firm, but soft enough to use a needle felting tool.
- If using balls of wool, gently needle felt the wool onto the head, then unwind each strand to give us nice little curls of hair. Go over any areas again with the needle felting tool if needed.
- Be careful when using needle felting tools, they are really sharp!
Attach to your craft project
When your characters are complete, they are now ready to add to your craft project. If you want to add your character to a plaque or sign, you can cut dry Hearty Clay with a sharp craft knife to give it a nice flat back.

Made also using the Katy Sue Wings Mould.

Made also using the Big Blossoms Mould and Cross Stitch Mould.

Made using our Basic Faces Mould.
Heather Robertson is an artist and TV craft demonstrator, you can find her here: www.heathrobertsonart.com
Facebook: /HeatherRobertsonArt
Instagram: @heatherrobertsonart
You might also like
Watch our video below showing five methods for painting faces using the Head & Arms Moulds – helpful for both crafters and cake decorators:
See our cake decorating blog post from the archives, making princess cupcakes using the Head & Arms Moulds with Sarah Harris from The Cupcake Range – CLICK HERE
Another one from the archives, a beautiful angel figure made in this blog post by Kirsty at Cakey Bake – CLICK HERE

Comments
Leave a comment