How to: Baby Elephant Bath Time Fun Cake with Sarah Harris from the Cupcake Range – Part 2

Welcome to Part 2 of the Sugar Buttons Baby Elephant Bath Time Fun cake! Yesterday Sarah Harris from the Cupcake Range showed you how to make the Rocky Road base of the bath. If you missed it, here it is!
In today’s post Sarah teaches you how to decorate the Rocky Road after it has set.
You
will need:
will need:
Katy Sue Designs baby elephant
mould
mould
Ingredients to make your
favourite Rocky Road recipe (or seeseparate blog entry for mine)
favourite Rocky Road recipe (or seeseparate blog entry for mine)
A4 sheet of acetate (or a mini cake tin/cake ring approximately
7cm wide and lined with parchment paper)
7cm wide and lined with parchment paper)
Ruler
Round cake drum (approximately
15cm wide)
15cm wide)
Chocolate flavoured or brown
fondant (for wood panels around the bath)
fondant (for wood panels around the bath)
White fondant
Small amount of black fondant
2 white nonpareils (for the
eyes)
eyes)
Baby
blue fondant (for ears and water)
blue fondant (for ears and water)
Edible glue
Large edible pearl balls (for
the bath bubbles – or use balls of white
fondant)
the bath bubbles – or use balls of white
fondant)
White modelling paste
(approximately 100 grams)
(approximately 100 grams)
Ribbon to go round the cake
drum and double sides tape to secure it (I
used brown grosgrain ribbon 15mm wide and about 50cm long)
drum and double sides tape to secure it (I
used brown grosgrain ribbon 15mm wide and about 50cm long)
Rolling pin
Optional
Extras:
Extras:
Wood grain texture mat/rolling
pin or cocktail stick
pin or cocktail stick
Swirls or ripple texture mat
(for the water)
(for the water)
Step 1:
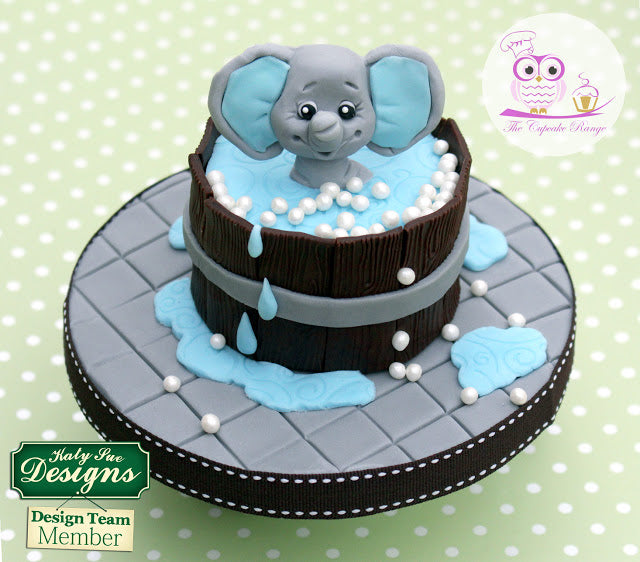
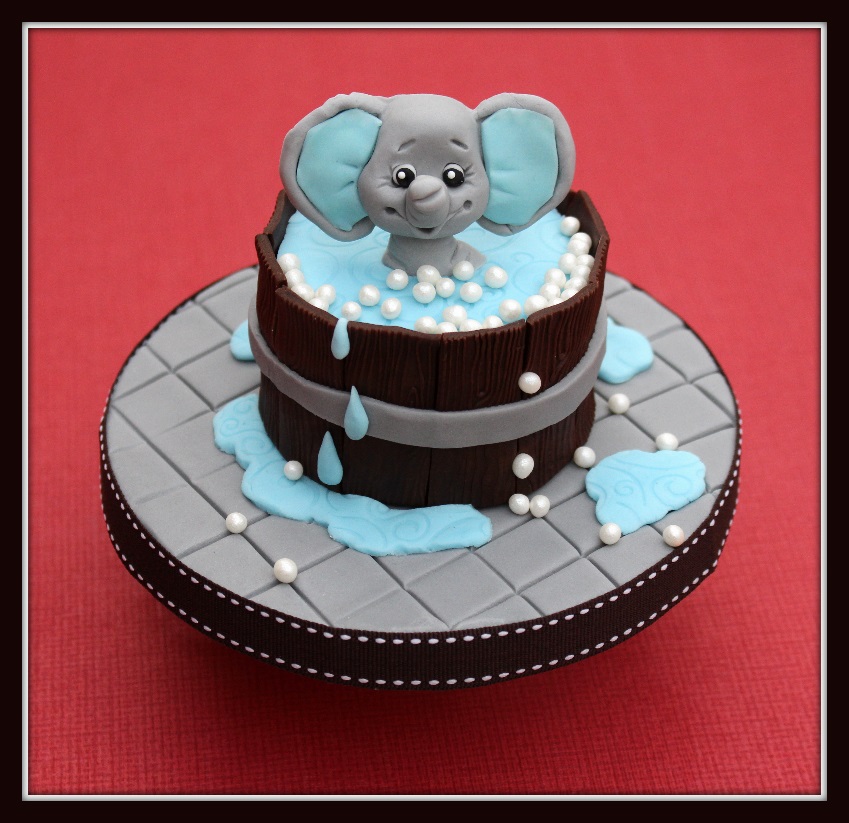
Make up some grey modelling paste for the elephant by adding a tiny piece of black fondant to some of the white modelling paste. Make elephant’s head, neck and trunk with the grey modelling paste. Add in eyes using a tiny ball of white modelling paste for each eye first, then a tiny ball of black fondant on top, then add a white nonpareil, as shown in the picture. Stick on the trunk using edible glue and leave to dry for a good few hours or overnight.
Once dry, press two thin pieces of baby blue fondant into the elephant mould for the inside of the ears, remove from the mould, neaten the edges and smooth into the inside of the two grey ears as seen in the photo above.
Step 2:
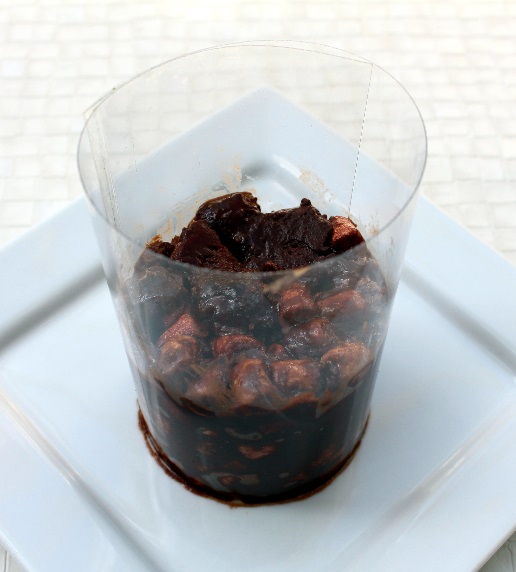
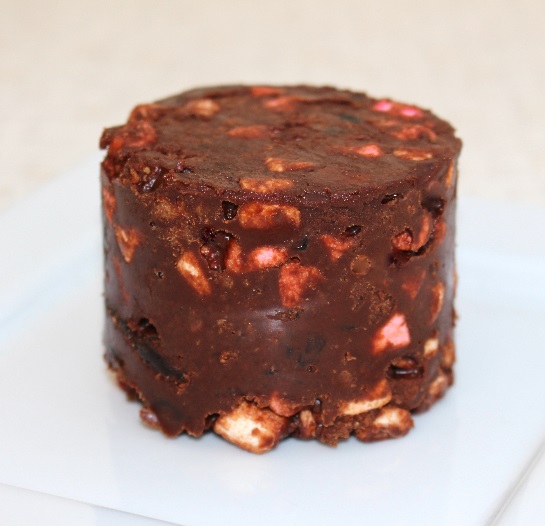
Make up the rocky road mixture and press into your cake tin which has been lined with parchment paper. If you don’t have a cake tin the right size, cut the A4 sheet of acetate in half lengthways and roll one half up to form a tube approximately 7cm wide and secure with sticky tape. Place the tube on top of a flat plate and press the rocky road mixture inside. Pack it down well so it forms a good round shape with a flat top. It should be about 4cm tall. See yesterday’s blog post.
You will have loads of rocky road mixture left to make more bath tubs or just your regular rocky road bars. Or the recipe can be scaled down to make less mixture if you just want to make a bath tub or two! Leave the rocky road to set in the fridge for a couple of hours.
Step 3:
Prepare the cake drum: add a tiny amount of black fondant to some white fondant to make a grey colour similar to the colour of your elephant
(TIP: Go easy on the black fondant, it really doesn’t take much to get a grey colour!).
Roll the grey fondant out and smooth onto the cake drum, trim and neaten the edges. To give a square tile effect, press the edge of a ruler into the soft fondant at intervals of approximately 2 cm, first one way and then the other, to make 2cm squares all over. Add the ribbon of your choice to the side of the cake drum and secure with double sided sticky tape.
Step 4:
When the rocky road has set, remove from the tin or acetate (TIP: If the top is a little uneven, turn upside down). Roll out a circle of baby blue fondant just slightly larger than the top of the rocky road “bath”
At this point you can add some texture to the fondant if you like, to resemble swirls or ripples. Apply fondant to top of rocky road and smooth down so it just goes over the top edge.
(TIP: Make sure your rocky road is not too cold at this point otherwise the fondant will have a tendency to go a bit sticky)
Step 5:
Prepare the wood panels: I made about 12 out of the chocolate flavoured fondant each measuring 1.5cm wide and 5cm long. Check yours for height, each panel needs to come just above the top of the blue fondant. I textured mine using a mini wood grain rolling pin; or you can mark in the wood grain using a cocktail stick or modelling tool if desired. Stick the panels all the way round the sides of the bath. Once they are all secure, carefully lift the bath tub up and position in the middle of the fondant covered cake drum.
Step 6:
Position the elephant’s head in the bath using edible glue to secure. Roll and cut a thin strip of grey modelling paste to go round the centre of the barrel using edible glue to attach, positioning the join at the back of the bath tub.
Step 7:
Press into the bath water, some edible pearls to represent bubbles, add in some baby blue (textured) fondant around the base of the bath tub to represent some water spilling over. Glue some blue fondant tear drop shapes to the wood panels to resemble water droplets and press in some pearls onto the wood panels and into the puddles of water.
Variations:
Use green fondant on the cake drum to represent grass instead of grey tiles and add in some pretty flowers.For a Christmassy effect use white fondant “snow” on the cake drum instead of the grey tiles and add in a few snow balls, holly leaves and berries or snowflakes.
Use green fondant on the cake drum to represent grass instead of grey tiles and add in some pretty flowers.For a Christmassy effect use white fondant “snow” on the cake drum instead of the grey tiles and add in a few snow balls, holly leaves and berries or snowflakes.
Use baby pink fondant for the elephant’s ears instead of baby blue.
Position the bath at the back of the cake drum, instead of the centre, leaving space for a greeting or name at the front. Katy Sue Designs small domed alphabet mould would be ideal for some lettering to create that special message.
Make a tiny yellow fondant duck and position in the bath or in one of the puddles of water at the front of the cake drum.
Make the bath out of rice krispie treats, or a mini chocolate cake covered in buttercream or ganache, instead of the rocky road.
If made out of rice krispie treats, omit the cake drum and use the bath tub as a topper for a big cake – ideal for a baby shower!
Make a bigger version, applying the same principles, but with the elephant lying in the bath:

This one has been decorated using Katy Sue Design moulds – Mini Domed Alphabet, Bow Trio and the new Bunting Extras.
I would love to see your creations and please let me know if you have any questions!
Leave a comment