
Christmas Bells Cake Tutorial by Lisa Speck
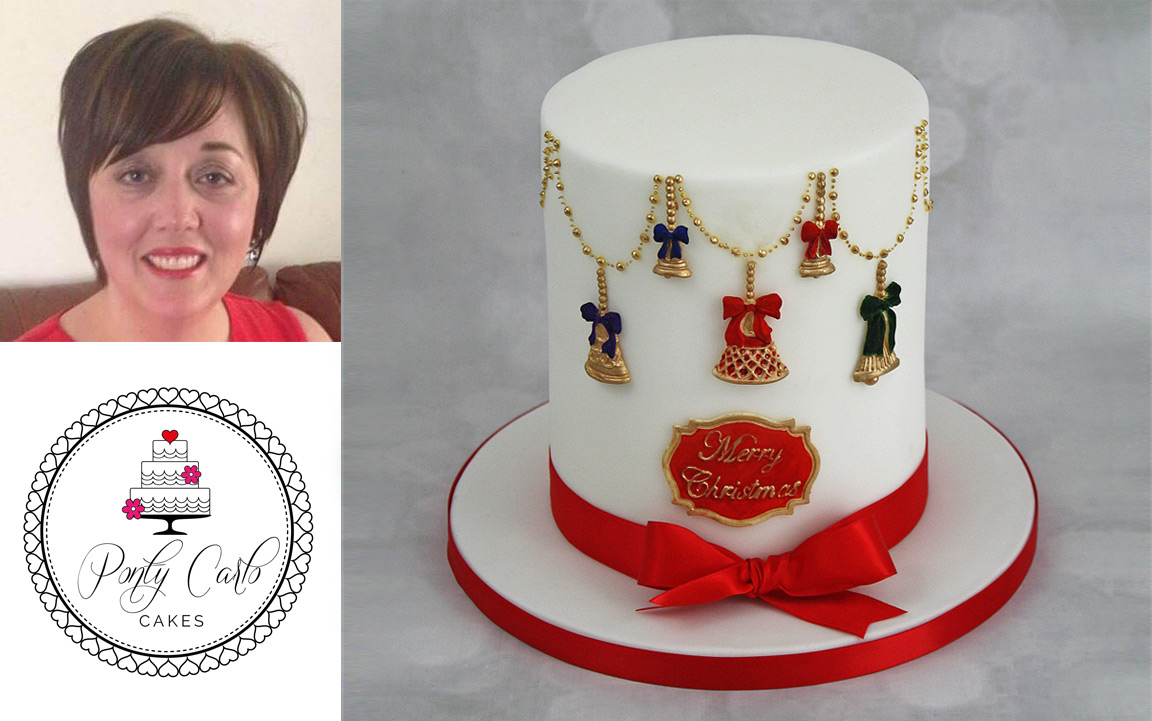
Follow this step by step tutorial by Lisa Speck from Ponty Carlo Cakes and create a beautiful festive Christmas Bell cake. Lisa has used our Christmas Bells embellishment mould and our Merry Christmas plaque mould. Visit Lisa’s website – Ponty Carlo Cakes.
Step 1
Cover your cake and board and leave to dry overnight.
I have used a 6 inch diameter cake x 7 inches in height and a 10 inch round base drum.

Step 2
Use a Wilton garland marker to mark 2 inch garlands with 0.5 inch gaps in between all around the cake.


Step 3
Colour some royal icing with an ochre based food colouring. I have used honey gold.
Fill a piping bag with your coloured icing,using a 1.5 icing tube,pipe full pearls on the marks that the garland has made in the icing and then pipe 2 x tiny pearls in the gap between the 2 big pearls. Continue all the way around the cake until the whole circumference has been piped. Leave to dry.

Step 4
Mix a small amount of gold edible dust with dipping solution to form a paint.
Very carefully with a small paintbrush, paint over the pearls and leave to dry.

Step 5
Using a 50/50 mix of flowerpaste and sugarpaste, coloured up with the bell food colouring of your choice, make some decorations by pushing small balls in to the katy sue mould and popping out.

Leave to dry slightly and paint the gold details with gold edible food dust mixed with dipping solution in the same way as you did with the piped pearls.

Step 6
Make a ‘Merry Christmas’ plaque in the same way.Make up a 50/50 mix of flowerpaste and sugarpaste in the colour of your choice, leave to dry and then paint the highlighted words and border with your gold paint mix.

Step 7
To stick on the cake, I use vodka as it does not leave a blemish on your cake that edible glue might do. I just paint the reverse of the decorations with vodka, leave to go sticky or rub in with your finger to speed up the process a little and then stick each decoration to your cake.
Step 8
Finish off your cake by tying a large ribbon bow around the base of the cake and then centralise it. Use a matching 15mm ribbon and stick to the edge of the drum edge using double sided sticky tape and secure at the back with a pearl headed pin.

Leave a comment