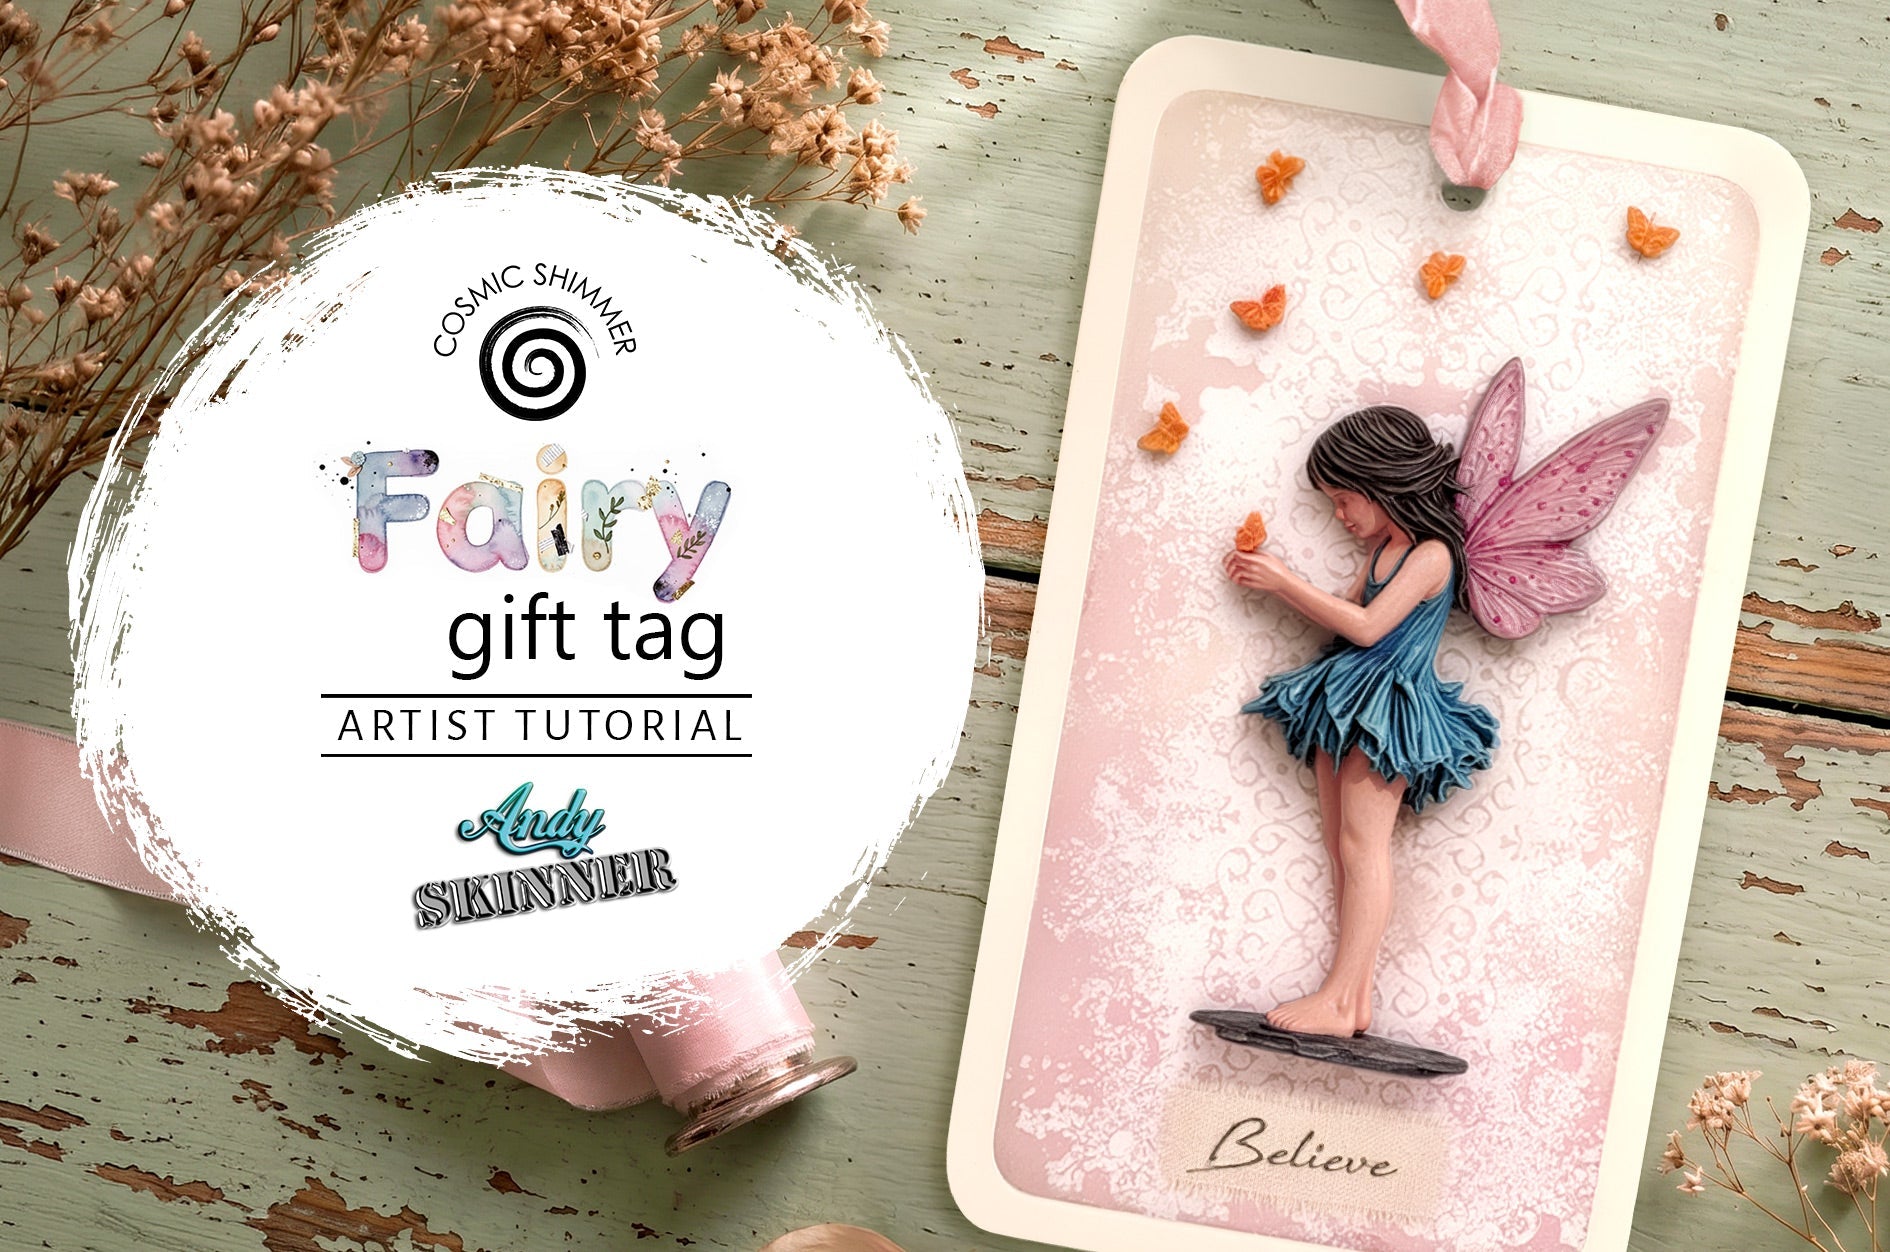
How to Create a Fairy Tale Journal Cover with Cosmic Shimmer Craft Moulds
Step into a world of woodland magic and create a beautifully detailed journal cover using the Cosmic Shimmer Enchanted Craft Moulds. In this tutorial, Sheena Douglass guides you through the full process – from moulding your elements in air drying clay to painting and assembling a beautifully layered, vintage-inspired design.
Perfect for mixed media artists and crafters, this project combines delicate fairy features, textured bookplate elements and stunning colour techniques to create a truly enchanting finish.
Watch Sheena's tutorial video and craft along to make your own Fairy Tale Journal Cover.
What You'll Need
Vegetable fat (such as Trex or Crisco)
Various paint brushes (various sizes including a rigger/liner brush and a flat edge brush)
Paint palette
Kitchen paper
Water Wipes
Sponge
Heat gun (optional)
Instructions
Step 1 – Preparing Your Clay Start by mixing your Hearty Air Drying Clay. Blend White Clay with a small amount of Brown to create a soft, porcelain-like off-white tone. This warmer shade gives a more natural, vintage finish than bright white. Once mixed, leave the clay exposed for 5–10 minutes to firm up slightly. Fresh clay can be too soft and damp, so allowing it to rest will make it easier to handle and reduce distortion. Top tip: Store unused clay wrapped in foil or an airtight container to keep it fresh.
Step 2 – Conditioning Your Moulds Lightly coat your moulds with a thin layer of vegetable fat. You only need a very small amount – just enough to create a slight sheen. This helps the clay release cleanly, especially in detailed areas like fairy wings and fine textures.
Step 3 – Moulding the Fairy and Butterflies Press a piece of clay firmly into the Cosmic Shimmer Fairy Queen Silicone Mould, starting from one area and working across to avoid trapping air bubbles. Use firm pressure to capture all the detail. Check for any missed areas before removing excess clay. Aim for a clean edge – like a fine outline around the mould. Carefully flex the mould to release the fairy, using the outer edge to ease it out. Repeat the process for the butterflies, using only a small amount of clay as these are shallower designs. Place all pieces on kitchen paper and leave to dry for 2–4 hours. Once surface dry, turn them over to dry fully and prevent curling.
Step 4 – Creating the Frame Base The Cosmic Shimmer Fairy Tales Frame Silicone Mould is large and detailed, and benefits from a slightly different approach. Roll out your clay before placing it into the mould. Press firmly, working across the design to capture fine details. Ensure all channels and text areas are well defined. Remove excess clay and smooth the back. If needed, lightly dampen your finger to smooth out imperfections. Carefully release the piece and allow it to dry thoroughly, turning it partway through drying to keep it flat.
Step 5 – Planning Your Layout Once dry, position your moulded Queen Fairy and butterflies on the Fairy Tales Frame to plan your composition. This layered arrangement creates a beautiful focal point and helps guide your painting choices.
Step 6 – Painting the Background Using Cosmic Shimmer Water-Based Inks, begin building your background colour. Apply darker tones (such as Olive Green and Dark Walnut) around the edges. Add lighter Golden Green for variation. Use a soft brush and pouncing motion for a natural, uneven finish. Gently wipe back raised areas with a water wipe to reveal detail and create a soft, aged effect. This technique gives the piece a vintage porcelain look with depth and character.
Step 7 – Adding Light with Gesso Apply Cosmic Shimmer White Gesso to the flowers and the central oval area. This creates a lighter base so colours applied later appear more vibrant and clean. Use a thin, controlled layer to avoid losing fine detail.
Step 8 – Building Colour and Depth Add colour back into the design. Use Marigold in the centre to create a soft glow. Deepen edges with Walnut Brown for a vignette effect. Blend using a sponge for a natural transition. For added opacity, mix a small amount of White Gesso with your inks before applying.
Step 9 – Painting Details Flowers: Mix Hot Magenta with a touch of Marigold to create a rich red tone. Apply over the gessoed areas, then soften with a light brown glaze for a vintage finish. Foliage: Use a rigger brush to paint fine grass and foliage details, building layers with green and brown tones. Edges: Frame the design by painting around the outer edge and central oval with a dark brown, adding definition and contrast.
Step 10 – Highlighting with Gold Mix Cosmic Shimmer Gold Iridescent Mica Pigment with a little water to create a paint. Carefully apply to raised filigree details using a fine brush. Work slowly for precision and build up shine gradually. The gesso base will help the gold appear brighter and more luminous.
Step 11 – Painting the Fairy Start with a soft skin tone using a mix of Buff and a touch of Hot Magenta. Apply lightly and build up gradually. Add subtle shading with diluted brown to define features without overworking the clay. For the wings: Blend soft greens with hints of purple. Use water to create a gentle ombré effect. Lightly wipe back areas to reveal delicate veining. Finish with coordinating colours for hair, clothing and details to tie the whole piece together.
Step 12 – Final Touches Once everything is dry, add any final highlights or shading. Assemble your elements onto your Journal cover. The result is a richly detailed, layered design with a magical, vintage feel.
Your Own Enchanted Story This project is a beautiful way to explore the detail and versatility of the Cosmic Shimmer Enchanted Craft Moulds. By combining sculpted elements with layered colour, you can create a journal cover that feels like it belongs in a storybook. Take your time, enjoy the process and let your creativity guide the final look.