Rocky Road Yule Log Project by Sarah Harris
Make this whimsical Rocky Road Yule Log for a festive treat this Christmas! Created by design team member Sarah Harris from The Cupcake Range. We hope you love it just as much as we do!
Shop now:
To Make the Chocolate Log:
Ingredients:

- 125g unsalted butter
- 300g dark chocolate
- 3 tablespoons golden syrup
- 300g roughly crushed biscuits (digestives or chocolate chip biscuits work well or for a spicy flavour use half ginger nut and half digestives)
- 150g glace cherries, chopped
- 150g mini marshmallows
- 60g raisins
- Icing sugar to dust
- A4 sheet of acetate cellotaped together to make a long thin tube
- Fork
- Palette knife
To decorate:
- KSD Sugar Buttons Snowman mould
- KSD Christmas Signposts mould (Merry Christmas)
- KSD Holly Trio mould
- Tiny bow mould – I used the bow from the smallest bell from the KSD Christmas Bells mould
- Cornflour to dust the moulds with
- Cake drum to place the log onto
- Ribbon to go around the cake drum
- 200g dark chocolate, approximately, to cover the log
- Edible glue
- Black non-pareils
- Fondant in white, orange, brown, green, red, pink, black and pastel blue
- White modelling paste
- Red edible marker pen (for the Merry Christmas sign)
- Rolling pin
- Small pair of scissors
- Cocktail stick
Method:
1. Melt the butter, chocolate and golden syrup over a gentle heat until smooth. Place all of the dry ingredients into a mixing bowl. Pour the chocolate mixture into the dry ingredients and mix until well combined.
2. Turn the acetate tube upright onto a flat plate and place teaspoons of the mixture into the acetate tube, pressing it down firmly as you go. I used the end of a rolling pin to pack it down. Continue until the acetate tube is full and level the top. Leave to set in the refrigerator for a few hours.
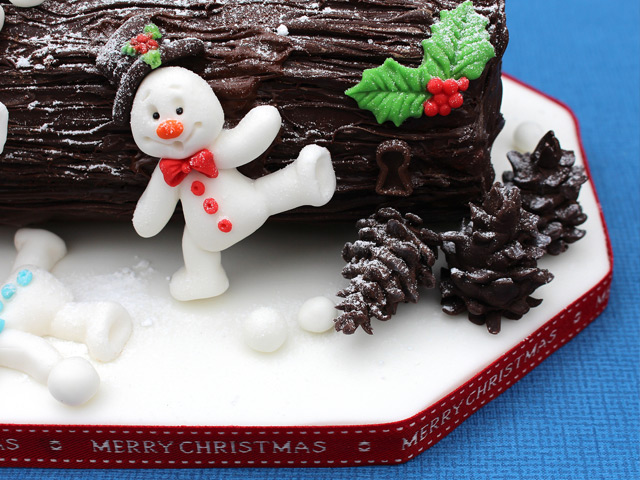
3. Meanwhile, cover a cake drum with white icing and attach a suitable festive ribbon around the edge. Make five snowmen in various poses as shown with orange noses and different coloured buttons and bow ties.
I used two tiny black non-pareils for each of the snowmen’s eyes, or you could use tiny dots of black fondant instead.
I made two snowmen’s hats using chocolate brown fondant and green and red for the holly leaves and berries.
Make a Merry Christmas sign with white modelling paste, leave to dry then with a red edible pen, colour in the red stripes and go over the writing.
Make two toadstools using white fondant for the stalks and red fondant for the caps. Dot the caps with tiny spots of white fondant.
Make three pine cones using chocolate fondant; roll the fondant into a large rounded teardrop shape, then with a pair of scissors pointing vertically downwards start to snip part way through the fondant all around the base of the fat end of the pine cone. Shape each snipped piece between finger and thumb to give it a rounded edge. Continue snipping all the way to the top, shaping as you go.
Make a few snowballs with white fondant and two holly leaves using green and red fondant and the KSD holly Trio mould.
4. Melt the 200g of dark chocolate and spread it all over the chocolate log including both ends, using a fork to create the bark texture. Leave to set.
5. Once set, lift the log and position in place in the middle of the cake drum and decorate as shown using edible glue or any left-over melted chocolate to secure everything in place.
For the snowman with the black bow tie sliding down the log, I partially inserted a cocktail stick underneath him for support until dry and then removed it. Finally lightly dust the scene with icing sugar to represent a fresh fall of snow.


Alternative suggestions:
- Make scarves for the snowmen instead of bow ties using one of the KSD knitted texture mats.
- Use milk chocolate instead of dark chocolate to cover the log.
- Use the KSD Seasons Greetings mini plaque mould instead of the Christmas sign post mould or use the KSD mini domed alphabet mould to personalise with your own special message.
Thank you to Sarah Harris from The Cupcake Range!


Comments
Leave a comment